Sunday, October 26, 2008

Adobe Photoshop Tutorials - Badges

Here are some of the easy steps to create badges. You can use it to link to any documents, links or photo gallery.


Step 1

Open new document with this sizes : 500px(width) X 200px(height). Fill the background of the new document with any colors or photo. It's your choice but for this tutorial, I'll be using wood interface.

Step 2

Using the Elliptical Marquee Tool, create a circle shape outline in the middle part of the document. Next, color with any colors you like.

Step 3

Use the Polygonal Marquee Tool to create the rectangle shape just like above (this is to create the "fold" shape). Right click the selected area and choose "Layer via Cut". Once you've done that, the circle shape should look like this (See below)


Step 4

Select the layer and go to Edit> Transform> Rotate. Rotate the "fold" shape to 180 degree.

Step 5

Select the circle layer and choose "Layer style". You need to make shadow for the folding part. Go to Gradient Overlay and set the setting's just like above.

You also need to create "Drop Shadow". See settings below.


Step 6

Select the "fold" layer and add this layer style settings.

Step 7

Create a new layer and add any symbols, logos or even shapes for your badge.


That's all. Simple and easy!

Download the sample PSD file with 3 badges here : http://www.ramesstudio.com/adobetuts/badges_sample.psd

I welcome any comments or suggestions.

Thanks,

Sunday, October 19, 2008

Adobe Photoshop Tutorials - 3D Typographic

It's very easy to create 3D text effect with Photoshop (even if you don't have Photoshop CS extended to do it).


Check out my easy 5 easy steps!

Step 1

Open a new document with the size of : 800px wdith x 400px height. Color the background to black. Next, make a another layer, right on top of it and use the brush tool (with light pinkish color) above the background color.

Step 2

Create the alphabet "a" by selecting the "Horizontal Type Tool". Next select the "Layer Style". On the window popup, select the "Gradient Overlay" and create gradient just like above. Once done, click OK.

Step 3


It's time to create the 3D effect (thickness). Select the "a" layer, hold down the alt key on the keyboard and press the down arrow key then the left arrow key (keeping alt key pressed down) do this about 10-15 times, this will determine the thickness of the alphabet. Now select all the thickness layer(except the "a" layer") then press "ctrl-e" to merge it all.

Step 4

Move the layer below the alphabet "a" and click on the layer style.

Step 5

Choose the "Gradient Layer" and color it to darker shades just like above image. After that, select "drop shadow" and set it according to your preference.


You're done! :)

Note : For other alphabets, use the exact same process, but for the step 3, try use the other arrows to create the depth. ie. right arrow and top arrow etc.

You can also create effects for the background. I've used the brushes from "Sparkling Effects" to create the effects for this. You might want to try it as well.

Here's the PSD file ("http://www.ramesstudio.com/adobetuts/3D_typo.zip)" for this tutorial, together with the fonts.

Hope you find this tutorial useful.

Wednesday, October 15, 2008

Adobe Photoshop Tutorials - HDR effects

What is HDR? High Dynamic Range (HDR) is a set of techniques that allows a greater dynamic range of exposures (the range of values between light and dark areas) than normal digital imaging techniques. The intention of HDR is to accurately represent the wide range of intensity levels found in real scenes ranging from direct sunlight to shadows. This method was developed to produce a high dynamic range image from a set of photographs taken with a range of exposures.

Source : Wikipedia

By right, to create HDR, you need at least 3 different exposures of a same photo, but in this tutorial, I'll be showing you how to create HDR from a single image in just 5 easy steps!


Step 1

First of all, open any photo that you want to convert to HDR. I'll using one of my Butterfly Park Photoshoot photo.

Step 2

Now, go to Image> Adjustments> Shadow/Highlights. Set the "Shadow" and "Highlights" amount to "50%"

Step 3

Make another copy of the photo by dragging it to the "New Layer" icon.

Step 4

Then go to Image> Adjustments> Desaturate (for CS3 users, choose "Image> Adjustments>Black & White" and click "OK")

Step 5

After that, change the layer blending to "Hard Light".

Done! Can you see the difference now?

Here are some of the photos taken by me from different locations around Malaysia using the same technique.


Do leave comment or question if you have any.

Cheers!

Sunday, October 12, 2008

Adobe Photoshop Tutorials - Sparkling Effects

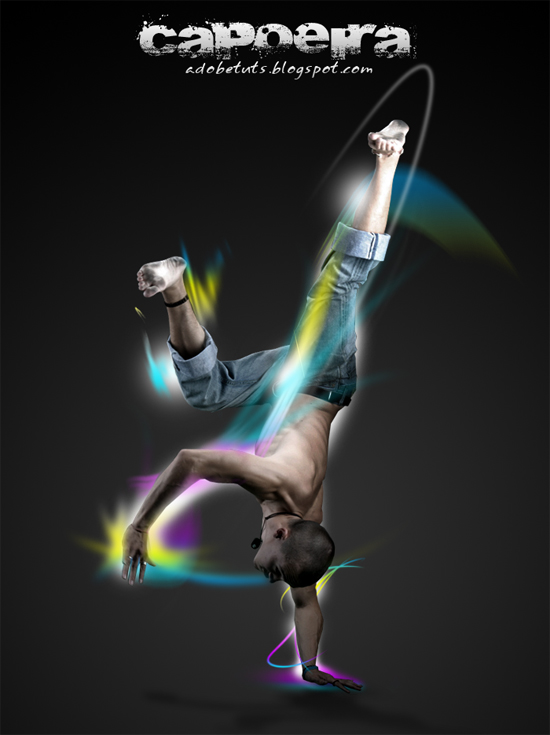
This is actually one of my personal favorite effect that I would to share with you all : The Sparkling Effects.


Download the photo above here : http://b-e-c-k-y-stock.deviantart.com/art/Chandar-5-35969106
Brushes here : http://www.ramesstudio.com/adobetuts/sparkling_brushes.zip

PS: It's actually a dance pose called "Capoeira" from Brazil. I'm sure you guys've seen it before. Pretty unique stock photo, that's why I choosed this one.

Step 1

Create a new document with the size of : 700px (width) and 900px (height). Fill it with black color and create a new layer on top of it. Select the "Brush tool"and choose grey color and click on the new layer you've created (at the bottom part just like above)

Step 2

Cut out the model's photo from the background using the cutting tools

Step 3

Paste it on to document. We need to create a shadow for the model. To do so, drag the model layer to the "new layer" icon.

Step 4

You'll get something like this. Now click on the bottom model layer and click on the "Layer Style" icon on the bottom part of the layer.

Step 5

Once the small window popup, under the "Color overlay" choose the blend color to black and click ok.

Step 6

Go to Edit> Free Transform> Distort and rotate/ distort the model layer just like above.

Step 7

Next, go to Filter> Blur> Gaussian Blur. Set the blur radius to "5.8" and click "ok"

Step 8

You've now created the shadow. choose the model photo (the one above the shadow) and go to Image> Adjustments> Hue and Saturation. Set the saturation slider to "-50" and click "ok"

Step 9

Now is the best part! Click on the "Brush tool" and click on the small arrow. Locate the brushes you've just downloaded (See brush download link above). Choose "Unreal_Brushes_v_4_by_Edelihu.abr" for now.

Step 10

Once you've done that, you'll see few brushes listed in the brush list. Choose any one of it (depends on your creativity, don't have to follow mine). Create a new layer before you paint.

Step 11

Click on the photo using that brush. You'll see something like above image. If you find the brush is not aligned with the model, go to "Edit> Free Transform". Rotate the brush till you're OK with the position. Now we need to color the brush. Click on the "Layer Style" button. Next, see "Step 12".

Step 12

Choose "Gradient Overlay". Click on the gradient bar, and a small window will popup. Set any color tones you prefer and click OK.

Step 13

Can see the results? Now, using the "Eraser Tool" too brush off the highlighted parts above, so that it looks like the motion effect is actually moving around the model's body. This is a repeating step. Go and choose other brush shapes you've downloaded and repeat Step 11 - Step 13. Remember to create new layer for each brush effect, so that you don't mess up the other layers.

Step 14

Once you've created the effects, its time to add some glow effects around the model. Make new layer below the model photo.

Step 15

Select "Brush tool" with the color white and click on the parts shown above to create the "shinning effects".

Coolness! You're done!


Here's another sample using this same steps but a little extra effect. Remember my photo manipulation tutorials? Yup! I've combined that tutorials with this one to come up with this!


What do you think? Do let me know.

Thanks and please try ya !

Wednesday, October 8, 2008

Adobe Photoshop Tutorials - Out Of Bounds (OOB)

What is OOB? OOB stands for Out Of Bounds. Pretty cool way to edit your photos to look as if it comes alive!


Here are some of the easy steps to get this done!

First of all, download the Bird photo here - (Taken by me at Bird's Park, Kuala Lumpur)

Step 1

Open new document, go to File> New. Set the width to 800 and the height to 400. Once you've done, fill the Background layer to red (#550000) or any colors that you like.

Step 2

Make another layer on top of the background layer. Use the Brush tool and click in the middle of the document using brighter red color (#9a0000) or other colors.

Step 3

Copy and paste the "Bird's" photo onto this document.

Step 4

Create another layer above the bird's photo. This is the frame layer. Use the "Rectangular Marquee Tool" to draw a rectangular shape outline just like above. Next fill it with black color.

Step 5

Once you've done that, select the "Rectangular Marquee Tool" again and draw a smaller rectangular shape on black color filled area and go to Edit> Clear to delete it. Now you
should see a black frame on the bird's photo.

Step 6

You need to distort the frame like above. To do this, go to Edit> Transform> Distort. You'll see 8 points around the frame. Click and drag those points to distort the frame.

Step 7

Now the frame is done. It's time to erase the outer part of the bird's photo using the cutting tools, either Polygonal Lasso or the Pen tool. Make sure you erase the circled parts on the bird photo as well (See above)

Step 8

Can you see that bird is now popping out from the frame? Cool isnt it. Now to make it way cooler and realistic, let's add some shadows beneath the frame.

Step 9

Make a new layer above the "Glow" layer. Use the Paint tool and click below the frame to create the shadow.

Step 10

Go to Edit> Transform> Distort to transform the shadow just like above.

Step 11

You can use the Eraser tool to adjust the shadow and guess what! You're done!

Here are some of the other samples created by me using different types of photos. It's all up to your imagination!


Download the PSD file here

How did you find this tutorial? Useful? Do let me know ya. Thanks.